
mariaDB 복제(를 해야 하는 이유)

mariaDB는 운영중에 백업을 하려면 덤프를 뜨거나 DB를 멈추고 백업을 해야 한다.
- 덤프를 백업을 하는데 백업받은 DB데이터를 실시간으로 덤프를 뜨기 어렵다
- DB를 멈추고 백업을 한다는 것은 운영을 중단한다는 거랑 같다
그래서 replica를 해서 master-slave로 하여 slave에서 멈춤-백업을 일정기간 할 수 있다.
mysql, mariaDB에서 하는 개념이다.
도커 스웜에서 master와 slave를 각각 만든다.
version: '3.8'
services:
  mariadb_primary:
    image: mariadb:10.11
    environment:
      - MYSQL_USER=ragoni
      - MYSQL_DATABASE=mydb
      - MYSQL_PASSWORD_FILE=/run/secrets/maria_password
      - MYSQL_ROOT_PASSWORD_FILE=/run/secrets/maria_root_password
      - TZ=Asia/Seoul
    command:
      - --server-id=1
      - --log-bin=mysql-bin
      - --binlog-format=ROW
    volumes:
      - /DB/primary:/var/lib/mysql
    networks:
      - dbnet
    ports:
      - "3306:3306"
    secrets:
      - maria_password
      - maria_root_password
    deploy:
      replicas: 1
      placement:
        constraints:
          - node.role == manager

  mariadb_replica:
    image: mariadb:10.11
    environment:
      - MYSQL_ROOT_PASSWORD_FILE=/run/secrets/maria_root_password
      - TZ=Asia/Seoul
    command:
      - --server-id=2
      - --relay-log=relay-bin
      - --read-only=1
    volumes:
      - /DB/replica:/var/lib/mysql
    networks:
      - dbnet
    secrets:
      - maria_root_password
    deploy:
      replicas: 1
      placement:
        constraints:
          - node.role == manager

networks:
  dbnet:                  # ← mariadb_net에서 수정
    external: true
secrets:                  # ← 추가
  maria_password:
    external: true
  maria_root_password:
    external: true
docker stack deploy -c /docker/DB/DB.yml db --detach=false
[root@rocky9 .ssh]# docker exec -it $(docker ps -q -f name=mariadb_primary) mysql -u root -p
Enter password:
Welcome to the MariaDB monitor.  Commands end with ; or \g.
Your MariaDB connection id is 5
Server version: 10.11.16-MariaDB-ubu2204-log mariadb.org binary distribution

Copyright (c) 2000, 2018, Oracle, MariaDB Corporation Ab and others.

Type 'help;' or '\h' for help. Type '\c' to clear the current input statement.

MariaDB [(none)]> CREATE USER 'replicator'@'%' IDENTIFIED BY 'repl_password';
Query OK, 0 rows affected (0.082 sec)

MariaDB [(none)]> GRANT REPLICATION SLAVE ON *.* TO 'replicator'@'%';
Query OK, 0 rows affected (0.004 sec)

MariaDB [(none)]> FLUSH PRIVILEGES;
Query OK, 0 rows affected (0.016 sec)

MariaDB [(none)]> SHOW MASTER STATUS;
+------------------+----------+--------------+------------------+
| File             | Position | Binlog_Do_DB | Binlog_Ignore_DB |
+------------------+----------+--------------+------------------+
| mysql-bin.000002 |      342 | mydb         |                  |
+------------------+----------+--------------+------------------+
1 row in set (0.003 sec)
replica 전용 계정 생성 및 설정 값 확인
[root@rocky9 .ssh]# docker exec -it $(docker ps -q -f name=mariadb_replica) mysql -u root -p
Enter password:
Welcome to the MariaDB monitor.  Commands end with ; or \g.
Your MariaDB connection id is 7
Server version: 10.11.16-MariaDB-ubu2204 mariadb.org binary distribution

Copyright (c) 2000, 2018, Oracle, MariaDB Corporation Ab and others.

Type 'help;' or '\h' for help. Type '\c' to clear the current input statement.

MariaDB [(none)]> STOP SLAVE;
Query OK, 0 rows affected (0.002 sec)

MariaDB [(none)]> ^C
MariaDB [(none)]> CHANGE MASTER TO
    ->   MASTER_HOST='mariadb_primary',
    ->   MASTER_USER='replicator',
    ->   MASTER_PASSWORD='repl_password',
    ->   MASTER_LOG_FILE='mysql-bin.000003',   -- FLUSH LOGS 후 바뀐 값
    ->   MASTER_LOG_POS=342;                     -- FLUSH LOGS 후엔 보통 4로 시작
Query OK, 0 rows affected, 1 warning (0.008 sec)

MariaDB [(none)]> ^DBye

-------------------------------------------------------------
STOP SLAVE;

CHANGE MASTER TO
  MASTER_HOST='mariadb_primary',
  MASTER_USER='replicator',
  MASTER_PASSWORD='repl_password',
  MASTER_LOG_FILE='mysql-bin.000002',   -- FLUSH LOGS 후 바뀐 값
  MASTER_LOG_POS=342;                     -- FLUSH LOGS 후엔 보통 4로 시작

START SLAVE;

SHOW SLAVE STATUS\G
복제 스탑, 설정, 기동, 확인
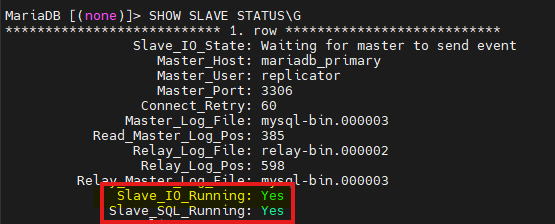
이렇게 되면 복제 성공
물론 network랑 도커 시크릿을 생성해야 위 yml이 성공적으로 기동 가능하다.
도커 스웜 명령어
매니저 노드에서 일단 확인
docker node ls 워커에서 조인할 꺼 알려줌
docker swarm join-token worker 나는 미리 zero-tier로 vpn으로 다 묶어놓음. 그러면 스웜포트 별도 개방 안해도 됨.
그리고 zertier를 대역대로 방화벽도 개방해 놓음
(이건 별도 설명 필요함~) 그래서 이렇게 나옴. 요걸 복사해서
1. 도커 설치
2. 워커노드에 그대로 복사 그러면


Member discussion